
 UCloud
Installation
This document will guide you through the process of obtaining and installing UCloud/IM for Kubernetes. By the end of this document you will be connected to UCloud’s sandbox environment.
Prerequisites
The UCloud Integration Module should be deployed on Kubernetes cluster running on a node, which does not run any user-jobs. We recommend that the Integration Module itself has the following minimum requirements available to it:
- OS: Linux (any distribution)
- CPU: x86_64 with at least 8 vCPU
- Memory: 32GB
Cluster minimum requirements:
- Kubernetes: UCloud supports the most recent three minor releases of Kubernetes. See the Kubernetes release history for more information.
- Filesystem: A distributed filesystem exposing a standard POSIX interface.
- K8s Networking: UCloud does not depend on non-standard K8s networking. It is actively developed and tested against Cilium.
In addition, the integration module must be deployed in a namespace which allows:
- Must allow inbound and outbound Internet connectivity
- Must have at least one node which should accept UCloud jobs
Obtaining the Software
UCloud/IM for Kubernetes can be installed using Helm. You can use the following commands to install it.
$ helm repo add sdu-escience https://sdu-escience.github.io/charts
$ helm repo update
$ helm show values sdu-escience/ucloud-im > values.yaml

# NOTE: At this point you MUST modify the values (see below)

$ helm install ucloud-im \
    sdu-escience/ucloud-im \
    --namespace ucloud-im \
    -f values.yaml
There are some prerequisites that must be manually configured before using the Helm chart to install UCloud/IM.
- Two namespaces must exist, one for running the UCloud/IM software and one for running all the user jobs. In the
following example we call these two namespaces
ucloud-imanducloud-appsrespectively. - Both namespaces must have a
PersistentVolumeClaimwith the same name, pointing to the same shared storage. This shared storage is used for storing user data. The volume must be configured withaccessModeset toReadWriteMany.
The following is an example of Kubernetes manifests that create the two namespaces and the required volumes. Here we
assume that there is a shared filesystem mounted on all nodes and we can simply access this via the HostPath option.
Adjust this based on the local storage system and installed CSI provisioners.
apiVersion: v1
kind: Namespace
metadata:
  name: ucloud-im
---
apiVersion: v1
kind: PersistentVolume
metadata:
  name: ucloud-im-user-data
spec:
  storageClassName: manual
  capacity:
    storage: 1Ti
  accessModes:
    - ReadWriteMany
  hostPath:
    path: /example/path
    type: Directory
---
apiVersion: v1
kind: PersistentVolumeClaim
metadata:
  name: ucloud-user-data
  namespace: ucloud-im
spec:
  volumeName: ucloud-im-user-data
  storageClassName: manual
  accessModes:
    - ReadWriteMany
  resources:
    requests:
      storage: 1Ti
apiVersion: v1
kind: Namespace
metadata:
  name: ucloud-apps
---
apiVersion: v1
kind: PersistentVolume
metadata:
  name: ucloud-apps-user-data
spec:
  storageClassName: manual
  capacity:
    storage: 1Ti
  accessModes:
    - ReadWriteMany
  hostPath:
    path: /example/path
    type: Directory
---
apiVersion: v1
kind: PersistentVolumeClaim
metadata:
  name: ucloud-user-data
  namespace: ucloud-apps
spec:
  volumeName: ucloud-apps-user-data
  storageClassName: manual
  accessModes:
    - ReadWriteMany
  resources:
    requests:
      storage: 1Ti
Chart configuration
The following is a minimal example of a Helm values file that can be used for installing UCloud/IM. For a full list of all configuration options, see the next section.
serviceAccount:
  create: true

ingress:
  enabled: true
  hosts:
    - "example.com"
    - "*.example.com"

provider:
  storage:
    size: 1Gi
    storageClass: example

apps:
  namespace: ucloud-apps
  storage:
    existingClaim: ucloud-user-data
Some general comments about the configuration.
-
UCloud/IM requires a service account with permissions to manage user jobs in the
ucloud-appsnamespace. This service account, including the required RBAC rules, is automatically created whenserviceAccount.createis enabled. -
UCloud/IM requires some storage for the provider configuration. A volume can automatically be provisioned, as in the example above, or you can provide an
existingClaimto use an existing volume. Be aware that the volume used for the configuration files cannot be the same volume used for the user data. -
UCloud/IM must be accessible via https on a public address. An ingress resource can automatically be provisioned.
-
Finally, some configuration is needed for the user jobs. In the
appssection we specify the namespace for running user jobs and the name of an existing volume for storing user data.
Use the following Helm command for installing the software.
$ helm install myrelease ./ucloud-im -n ucloud-im -f values.yaml
Helm Values
Reference for all available Helm values.
| Name | Description | Value |
|---|---|---|
serviceAccount.create | Specifies whether a ServiceAccount should be created | true |
serviceAccount.annotations | Additional custom annotations for the ServiceAccount | {} |
serviceAccount.name | The name of the ServiceAccount to use | "" |
netpol.enabled | Create network policies for the deployments | true |
netpol.ingress.http.allowed | Allow ingress traffic to the http endpoint | true |
netpol.ingress.http.namespace | Allow only ingress traffic to the http endpoint from this namespace | "" |
netpol.ingress.metrics.allowed | Allow ingress traffic to the metrics endpoint | true |
netpol.ingress.metrics.namespace | Allow only ingress traffic to the metrics endpoint from this namespace | "" |
ingress.enabled | Specifies whether an Ingress should be created | false |
ingress.annotations | Additional custom annotations for the Ingress | {} |
ingress.hosts | List of hosts used for the Ingress | [] |
ingress.tls | TLS configuration the Ingress | [] |
provider.revisionHistoryLimit | The number of retained replica sets to allow rollback | 2 |
provider.nodeSelector | Node selector labels for provider pods | {} |
provider.annotations | Annotations for provider pods | {} |
provider.tolerations | Tolerations for provider pods | [] |
provider.affinity | Affinity for provider pods | {} |
provider.strategyType | Strategy type for replacing provider pods | "" |
provider.command | Overrride the command for the provider container | ["/usr/bin/ucloud"] |
provider.storage.size | Persistent Volume size | 1Gi |
provider.storage.storageClass | Persistent Volume storage class | "" |
provider.storage.accessModes | Persistent Volume access modes | ["ReadWriteMany"] |
provider.storage.existingClaim | Use an existing PVC which must be created beforehand | "" |
provider.storage.subPath | The subdirectory of the volume to mount in the containers | "" |
provider.storage.selector | Additional labels to match for the PVC | {} |
provider.storage.dataSource | Custom data source for the PVC | {} |
provider.image.repository | Provider image repository | dreg.cloud.sdu.dk/ucloud/im2 |
provider.image.pullPolicy | Provider image pull policy | IfNotPresent |
provider.image.tag | Provider image tag | "" |
provider.service.type | Provider service type | ClusterIP |
provider.service.annotations | Provider service annotations | {} |
envoy.revisionHistoryLimit | The number of retained replica sets to allow rollback | 2 |
envoy.nodeSelector | Node selector labels for envoy pods | {} |
envoy.annotations | Annotations for envoy pods | {} |
envoy.tolerations | Tolerations for envoy pods | [] |
envoy.affinity | Affinity for envoy pods | {} |
envoy.strategyType | Strategy type for replacing envoy pods | "" |
envoy.image.repository | Envoy image repository | envoyproxy/envoy |
envoy.image.pullPolicy | Envoy image pull policy | IfNotPresent |
envoy.image.tag | Envoy image tag | v1.23-latest |
envoy.service.type | Envoy service type | ClusterIP |
envoy.service.annotations | Envoy service annotations | {} |
apps.namespace | Namespace for running user jobs | ucloud-apps |
apps.storage.existingClaim | Use an existing PVC which must be created beforehand | "" |
apps.storage.subPath | The subdirectory of the volume to mount in the containers | "" |
apps.netpol.enabled | Create network policies for the apps namespace | true |
apps.netpol.egress.allowed | Allow egress traffic from the apps namespace | true |
apps.netpol.egress.blockPrivate | Block egress traffic to private IPv4 subnets | true |
apps.netpol.egress.toRules | Custom rules for allowing egress traffic | [] |
Registering as a Provider
This section will create a secret file containing your credentials. By default, it will be located at
/etc/ucloud/server.yml. Please keep this file safe and keep a backup of it. In case of a re-installation, you
should aim to re-use this file.
Before you can start UCloud/IM, you must register as a service provider. This only needs to be done once. You may receive a test provider in UCloud’s sandbox environment by contacting the support team.
Once the registration is complete, you now have a provider on UCloud’s sandbox environment. From the UCloud interface, you should now be able to select your provider project from the project switcher. You can add other UCloud users to help manage your provider by inviting them through the interface. See the end-user documentation for more details.
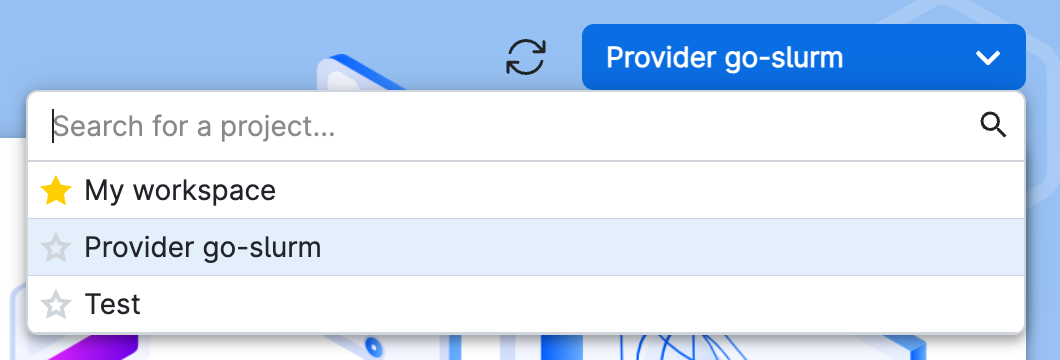
You will be able to manage parts of your provider through UCloud’s interface. To do this, you must first select the provider project which you are automatically added to.